Posts

Video Final Blogger

Image
Video Final Blogger Short Film For this project, we had to come up with a original script idea, and make that come to life. The project probably took us about 1 month to make, so it was a long process. The main challenge we faced was just coming up with an idea to do, because we had to come up with an idea after we got our group. We ended up using Drews idea, but changing the script a lot to fit a comedy. What we learned along the way is how to come up with an original idea, put it in a story that makes since, and execute it with editing. Some feedback we were given was there was some continuity errors, as my headphones disappeared and we didn't see Jeremiah go upstairs. At first, we were going to make the main character have a best friend, but we felt like that would be unimportant and a simple story would be better. Our video was solid, and for a comedy, it made people laugh. I liked how it turned out. Movie Trailer For this project, we had to recreate a movie traile...

Graphic Design Final Blogpost

Image
Graphic Design Final Blog Post My Favorite Projects My favorite project to do was the vector illustrated project. What we had to do was trace over a choice of a family member using the pen tool, and shade in spots of the picture. In the end, we made a simple version of the picture you chose. The picture I chose was a picture of my dog. This project took me about 3-4 weeks to complete. The main challenge I faced was tracing over the darker/lighter parts of my dogs, and making those parts the correct color. The main skill I learned during the project was accurately tracing over pictures. Throughout the whole project, I always thought I was done, but someone would always tell me that there could be more shading. Others peoples advice telling me to do more shading motivated me to do extra shading, which would make it look less cartoonish. At the very beginning, I was going to do a picture of myself, but I decided to go with my dog instead, which I thought was a good change I made. T...

Movie Trailer Blogger

The project we did was recreating a movie trailer. Our group chose "Napoleon Dynamite". Process In preproduction, we worked on looking at all the clips, drawing them out, and putting what time that happens. We also put all of the lines our actors had to say. During production, we filmed all of our clips, including going to places like the lockers, my house, and Woodland Elementary. During Post production, we entered in the slides, the music, and put the clips in order. What I Learned I didn't learn as much of technology things like hardware snd software. I learned mostly acting and teamwork, as I was our main actor and I acted in a couple other videos. It was hard, and you had to cooperate well, but it was fun. What I Would Do Differently/Same One thing I would do differently is filming earlier so we didn't cram editing at the end. One thing I would do the same is our clips were good, and that was probably because we worked hard on pre production. What Ex...

Vector Illustrated Portrait Blog

Image
Vector Illustrated Portrait Blog Pre Production I didn't really want to do a photo of me, so I wanted to choose one of my family members. I already had a pretty solid picture of my dog, so I decided to do my dog. I first made two art boards and then made one brighter to make a bigger color contrast between the different shade. Production The new experiences I learned was tracing shaded regions so my dog didn't look like a clip art. Something new I learned was just looking close to detail and making sure I traced over all the shading. I organized my workspace by naming all the big body parts so I can easily find the parts I was editing. Some ways I was able to problem solve was I always just persevered though it and added more layers until it looked good. The element I focused most on is making it look real instead of clip art, and I felt decent about it, but it could have been better. Final Product Overall, I am pleased with the project I did.Overall if I we...

Music Video Blogger

Image
Music Video Blog The Music We chose and the Theme We Portrayed The music we chose was From Your Mouth from God Lives Underwater. The theme I wanted to Portray was serious but yet cool because he was serious through the whole video but he was eating in reverse and it looked like he was pulling the food from your mouth. The Process The first thing we did is we researched different music videos, and chose one that is clean and we could realistically do. Then, after that, we filled out our story board so we knew what the actor should do and how quickly he should do it. Then, we made a shopping list of all the food we needed. Then, we met at Johns house and me and drew filmed him eating. Finally, Ethan edited but we all helped him. My Role The main role I did was planning out what he should eat, and how quickly he should do it. Technically The main thing we learned is how to edit in reverse. Professionally The main thing we learned is teamwork. We had to find ...

Typography Blog

Image
Typography Blog Pre Production During this typography project, we had to find quotes, type them in a cool font, then made posts about the quotes. The first thing we did with this project is find quotes. I actually struggled with this because I never have been a quote guy, so this took me a little while. I found quotes by searching up people I think is inspirational and using the quotes that are applicable to my life. Then, I found a bunch of cool fonts and downloaded them. That was all for the Pre-Production. Production The first thing I did during the production was I chose the fonts that would work well with the theme of my quote. Then, I added some graphics by tracing photos I found online. The thing I learned the most is what type would work the best and how to line it up well. Color was more difficult than just plain black and white because you now have to keep a consistent theme with your quote, the type you chose, and the color.  I would prefer color because you...

Writing a Story

The way you write a news story is the stagagy called “inverted pyramid”. You put all the good stuff at the beginning so the readers will keep on reading the article. The process I took was I first chose my topic, then found facts, then created the news story. The thing I liked most about writing a news story is was I got to be creative on the topic I chose. I like the freedom of choosing whatever I wanted The thing I need to work on is starting the story off strong so readers keep on reading. I really should of spent more time on the start. The thing I would keep the same is the topic. I felt my topic was strong and I wouldn’t change it. What I need to enhance in my next project is to start strong so people keep on watching my video. My final conclusion is that I need to work on making a good start, and I need to work on writing articles a lot.

Semester 1 final blog

Image
Second Feature News Story The first video I'm going to talk about is the baseball interview I did. This one took about a week and a half. The biggest challenge I faced was finding people to interview and what time to do it. Luckily, Grant Howard said he could get out of class and we did it during 3rd hour, and Drew was in our group. What I learned was what makes an interesting story, because this was an interesting story unlike my first one. We didn't review this project so I didn't get feedback. One thing I would change is maybe some background music. My overall opinion is we got good videos with the interviews, but we used footage on phone, so that footage was bad. ONW Now News Story Unfortunately, I don't have this video, because I'm doing this during Christmas and I can't get the video. But our video was about wrestling. This one took us about 2-3 weeks. The biggest challenge we faced was we all didn't know anything about the wrestling team...

ONW Now Blog

ONW Now Blog We, as sophomores, got to experience doing ONW Now a little early. When we were choosing jobs, all I said is I don't want to be an anchor, and I would rather do sports instead. I ended up getting sports. Then, the other team took basketball, so we had the choice of wrestling, woman basketball, Swim and Dive, and bowling. We chose wrestling.  What Makes a Good News Story? Our story was wrestling, and all of our group members knew nothing about wrestling. It was hard to come up with an interesting news story about the wrestling team, knowing nothing about it. We had to read some articles about the wrestling team and ask wrestlers about how they were doing. You got to chose a topic that is recent, and they recently had a tournament, so we went with that. What also makes a good story is interviews, because it always gets a new perspective. We got Henry Boutwell and interviewed him, so that was a good idea. Overall for none of us not knowing anything about wrestl...

Semester 1 Self Performance

Image
Semester Self Performance We made multiple projects, but the three I'm going to talk about is Photoshop Challenge 1, Photoshop Challenge 2, and the Infographic. If you want to see the projects I worked on throughout the semester, click here to see my behance profile. Later, I self reflect on how I did as a student of graphic design. Photoshop Challenge 1 Photoshop Challenge was the first major project we did that wasn't a tutorial. Basically, we were given a picture of a man, and we had to use photoshop to make it more nature-like. It took me about a week to a week and a half to finish this project. Some of the challenges I faced in this project was that I was not being as familiar with the tools and photoshop in general. But, I got through it. Along the way, I learned tools like the stamp tool, the quick selections, and how layers are used in general. The feedback I was given at first was not using all the tools we were supposed to do, but I fixed that. At first, all I ...

Baseball Interview Blogpost

Image
Our story we chose was the future of ONW baseball, because we felt like they had the biggest chance of winning state out of all the ONW teams. We all started the whole process by individually making 3 ideas on what we could make our story on. Then, when we got into our groups, we threw ideas off of each other till we found a decent news story. Then, once we found out of story idea, we came up with questions to ask Drew and Grant, the two people we interviewed. We then filmed both people asking the questions we came up with. Then I individually edited my video and lied it to fit how I wanted my video to look like, without the voiceover. After I sequenced the video I made a script for myself and the voiceover, and recorded it. Once the voice over was done I added it to my video and the video was complete. My role was to come up with the questions and film. The things I learned along the way was to make your voiceover a story, not just repeating the question like I did last time. I th...

John Wallace Interview

 The story we found was John Wallace living in South America for 3 years. We first found out who we are going to interview and what questions we were going to ask him. Then we started filming B-Roll, which was pretty difficult for us because we can't go to South America to get B-Roll. Then, we recorded all of Johns questions in one take. Then, we edited our video and fit the voiceover within our video. I didn't really have a job this time. I wasn't the director or the person getting interviewed. I recorded a little and I edited, but that was it. I did use collaboration to choose what questions to ask. One thing I would do differently is for my voice over, I want to explain a story more instead of just stating the question. One thing I would do the same is our story was pretty interesting. One thing I would do differently is doing my voice over more of a story instead of restating the question.One thing I will draw from this project is to spend more time on the voic...

Water Color Printing

Image
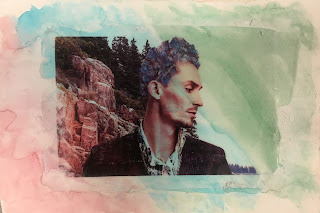
First, we used water colors to paint two backgrounds. Then, we had to print our 2 best projects, and reduce them in size so they will fit on the paper. Then we had to brush mod podge on the front of your picture to get the shininess of it. After that, we plopped the picture on the background and used the squeegee to flatten it out. Then, after it dried a little, we dipped our finger in water rubbed the paper off, so the picture didn't look as fuzzy. Then after we got all the paper off, we were done. One of my projects were pretty good while the other turned out pretty bad. The one up top was my good one, but I had one on an orange background with my "photoshop 2" project that turned out bad. When I was using the squeegee, my picture was tearing apart and it just didn't turn out good. The part I struggled with the most was putting on the mod podge, but the best thing I did was the backgrounds.

Different Types of Printing Processes

Image
Relief Process The Relief Process is a way you can transfer images by using hand using a small barren. You have to place a thin paper on the wood with the art and apply a little pressure to get your art transferred. People use this type of printing process because it provides a nice grain texture on the black areas. The grain effect allows the painting to not look flat and that gives an artist an advantage. When making cuts on the wood, you often use different sets of wood carvers to get a variety of marks, width, and depths. Then, when you are making the art, you can choose while lines, which is removing the wood, or black lines, which is keeping it. This gives the art a 3D look to the art. Linoleum printing is a type of relief printing that gives it more of a flat look. Linoleum printing has the exact same approach except you remove material from a thick paper not a wood block 1) First, you start by toning your wood block with an Indian ink wash or a wash of jet black film...

ONW Procedures Blog

Image
Our first idea was to do go zones, and the concept we decided immediately is to show the wrong way then show the correct way. Then, once we decided what we are going to do and how we are going to execute it, we moves on to the story board. On the story board, we decided what kind of shots we were going to show and how we were going to show the right way vs the wrong way without blankly stating it. We decided to use sad music vs happy music and black and white vs color. Then, I gave all the parts to people, because I was director. Then, while we were filming, we got people from Mr. Netterville's class to crowed up the hallway more. Then during editing, I leveled some shots, put in music, and changed the clips to black and white. I was director of my group, and I learned leadership, because I had to assign parts, and record, and confirm that everything was going smoothly. Technically, I edited and recorded.  The thing I would do different is edit it so the music faded out, so ...

Photo Portrait Blog

Image
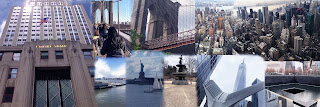
I have gone to New York City twice, and both times were because of my brother does a lot with musical theater. At first, I was fine with going to New York, but it wouldn't be my number 1 place to go. But, I heard all of the random things we were seeing and got more optimistic about going. So first, when we arrived, it was mostly all about my brothers theater, and I'm not a theater guy so I won't talk much about the beginning. After all the theater things, I got to do some of the stuff I like with my family. Some of the stuff included the Empire State Building, Statue of Liberty, 9/11 memorial, Top Rock (thats where I got the 2 overhead pictures), Brooklyn Bridge, etc. I really enjoyed tours and stuff like that, so this was up my alley. We spent about 3 whole days going to random places, and we pretty much walked the whole time all three days. The last couple of things we did was Central Park and the Toys R Us on Times Square. Then we loaded up and left for Ohio right ...

Pop Art blog

Image
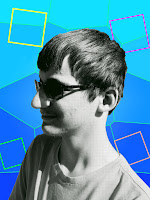
I started creating my design by changing the style with Nathan. Then I moved on to the background. I chose the filter stained glass and changed the shape size to max to get my background the way it is. Then I moved on to painting Nathans shirt red to add some more color to the project. I chose darken as the style color. Then, finally, I put random colored squares to add a little more to the background. The color scheme I decided on was was more magenta/blue-ish. The reason I chose that was becauseI feel like they are pretty colors and show a nice blend of warm and cool colors. The colors stuck out more that I thought because I added a bunch of rocks that were gray, and the colors really popped out there. The artist I based most of my art of was Roy Lichtenstein. The thing he does with his people is make them into tiny dots, and then he adds color. Thats what I did with Nathan. In the background, I sort of did a Warhol style, because he added random squares in some of his arts like ...

My Rocket League Blog

All I did was played Rocket League. I chose Rocket League because  it is my favorite video game and I have been playing it for awhile. Roman inspired me to do Rocket League because we talked about doing video games and I didn't have any other ideas so I chose to play Rocket League. Overall I think Rocket League is a good game and Psyonix did a very good job at the mechanics, color, etc. The game got me addicted  to it for awhile so I thought I should play it. There were a few techniques I used. One was that turned off all the lights so the Tv didn't have glare. The I just propped it up on my couch and zoomed in a little to get the framing done. I wanted the Camera to show the whole screen and little amount of black space around it. Playing video games and recording yourself doesn't seem very hard, but getting it to record and stand up, and to frame it well, and that took a little bit of work. So I wanted to show I put a little time and effort in this video. I hope vie...

Photoshop Challenge 1

Image
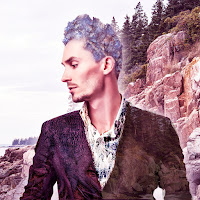
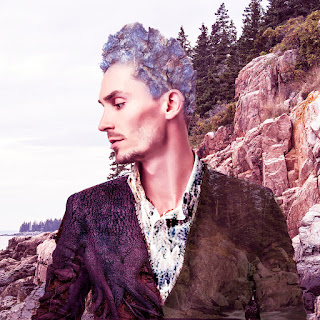
The assignment we had to do was take a random picture of a man and edit him with pictures of nature. It was actually pretty difficult. The idea that popped into my head was to use rocks as the hair, then spit the tux into three separate parts, the right, the left, and the middle. My idea didn't really change during the process. I started with the hair first, and used the stamp tool. Looking back I shouldn't of used the stamp tool to do the hair but it worked fine. I didn't use the blending or masks, and looking back, I should of used that as well. The types of adjustments I used was brightness and color balance. I put the brightness up and I changed the color balance to red, magenta, and blue. Overall, I was decently happy with my project. The only thing I would change is the hair. I feel like I could of done way better at the hair.

Photoshop Tutorials

Image
This project we watched videos telling us what to do and then we did it ourselves. A lot of the projects were about fixing up pictures and making them more professional, usually involving removing something in the picture. Some examples were price tags, pols, branches, etc. Then we had one final project with three pictures of one girl and we combined them into one. We did things like make the trees even on all three photos, remove branches, make the picture show her whole arm, etc. These tutorials were good to know because I know nothing about photoshop. But, I struggled a lot finishing these tutorials. So I did not like doing the tutorials. But I just pushed through it and got done a little later than everyone else. These will be things I need to know in future projects, so I'm glad to know little more about these tools.